PRINCIPLES OF ARCHITECTURE - HAND DRAFTING LESSONS

BEGINNER LEVEL - COMMUNICATION ACTIVITY
Grab a partner and sit back to back. The teacher will give one partner a blank paper and the other partner a paper with a design on it. Their job will be to describe the design with words so that the other partner can draw it without seeing it. The team that gets closest to the correct design will get a prize. Any cheating will get the team disqualified.
Ask yourself, what helps to make this process more efficient? Clear Communication, Correct Terminology, Appealing to Standards, etc
Ask yourself, what helps to make this process more efficient? Clear Communication, Correct Terminology, Appealing to Standards, etc

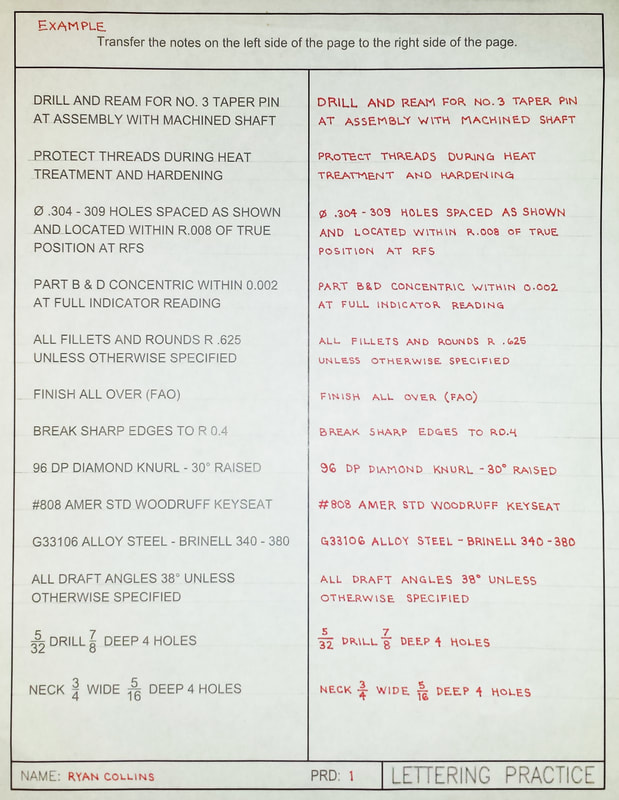
BEGINNER LEVEL - LETTERING PRACTICE
Objective(s): To learn the importance of using proper written communication skills in the design and construction or architectural projects.
Big Question(s): How can I write to effectively communicate my design intent?
Vocabulary Term(s): Lettering, Spacing, Consistency, Uniformity
TEKS: (5B) develop written communications such as estimates, work orders, and memos, (5E) write reports and documents such as estimates, permits, memos, and technical reports, (12C) create memos and notes
ELPS: (1E) internalize new basic and academic language by using and reusing it in meaningful ways in speaking and writing activities that build concept and language attainment
The handwritten notes on the right side of the page should look EXACTLY like the typed notes on the left side of the page.

CLICK TO DOWNLOAD PDF WORKSHEET
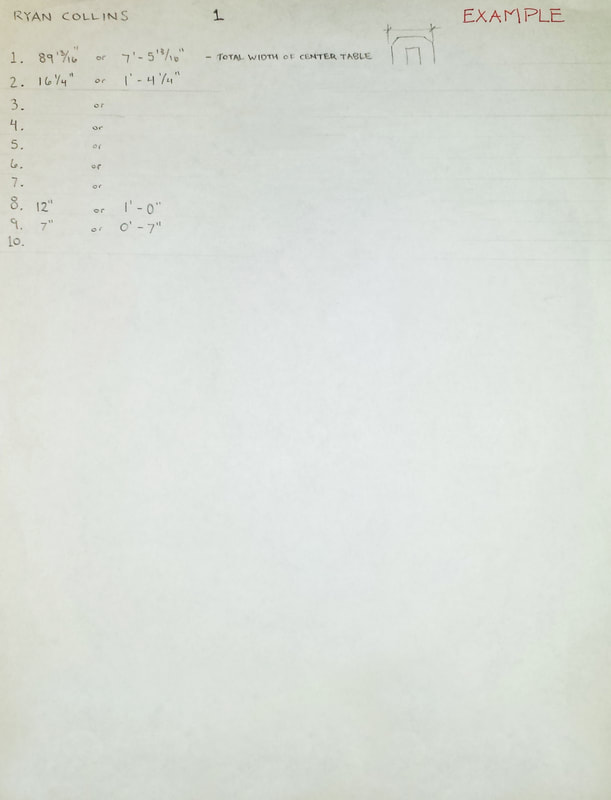
INTERMEDIATE LEVEL - MEASURING PRACTICE
Objective(s): To continue focusing on importance of using proper written communication skills while learning basic measuring skills.
Big Question(s): How do I use a tape measure and ruler to measure existing objects? How do I write those measurements according to industry standards.
Vocabulary Term(s): Measuring, Tape Measure, Ruler, Feet, Inches, Architectural Symbols, Width, Length, Height, Depth
TEKS: (2D) perform measurement tasks using ratios, fractions, and proportions, (29B) recognize elements and symbols of blueprints and drawings, (5B) develop written communications such as estimates, work orders, and memos, (5E) write reports and documents such as estimates, permits, memos, and technical reports, (12C) create memos and notes
ELPS: (1A) use prior knowledge and experiences to understand meanings in English
Using a blank sheet of printer paper, go around the room and make 10 different measurements. List them as shown below in the example: show the measurement in inches only, show the measurement in feet and inches, accurately describe what you measured, and if necessary draw a quick sketch of what you measured. Make sure you use the same good lettering skills you used in the above assignment.
Width = distance from left side to right side
Height = distance from top to bottom
Depth = distance from front to back
Length = distance of a long slender object
Width = distance from left side to right side
Height = distance from top to bottom
Depth = distance from front to back
Length = distance of a long slender object

CLICK TO DOWNLOAD WORKSHEET
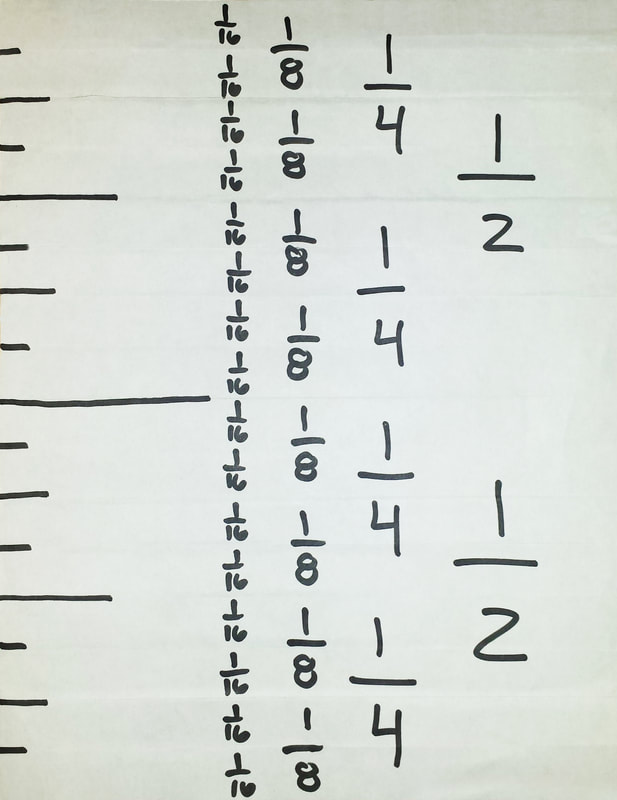
Use the guide below to understand how an inch is divided into its sections; fractions of an inch. You can also go to http://www.rulergame.net/ to practice using a ruler.
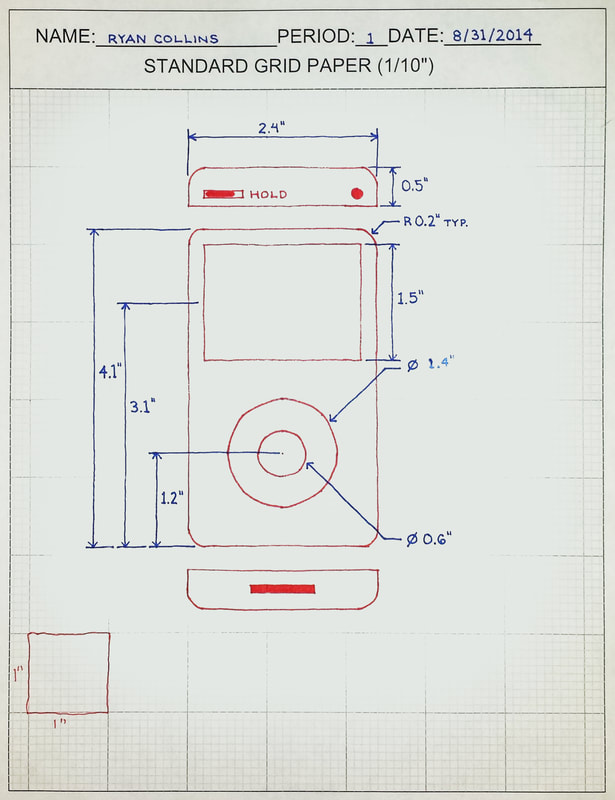
ADVANCED LEVEL - MECHANICAL DRAWING PRACTICE
Objective(s): To continue focusing on importance of using proper written communication skills while learning basic technical drawing skills.
Big Question(s): How do I use grid paper to create a scaled technical drawing?
Vocabulary Term(s): Technical/Mechanical Drawing, Artistic Drawing, Drafting, Sketching, Scale, Leader, Radius, Diameter, Architectural Symbols
TEKS: (29B) recognize elements and symbols of blueprints and drawings, (29D) recognize different classifications of drawings, (29E) interpret and use drawing dimensions, (12C) create memos and notes
ELPS: (1F) use accessible language and learn new and essential language in the process
Draft the following design on a grid paper using precise drawing and lettering techniques.

CLICK TO DOWNLOAD GRID PAPER
|

CLICK TO DOWNLOAD SAMPLE
|
PART 1
PART 2
MASTERY LEVEL - MECHANICAL DRAWING DESIGN
Objective(s): To continue focusing on importance of using proper written communication skills while learning basic technical drawing skills.
Big Question(s): How do I use grid paper to create a scaled technical drawing?
Vocabulary Term(s): Technical/Mechanical Drawing, Artistic Drawing, Drafting, Sketching. Design, Scale, Leader, Radius, Diameter, Architectural Symbols
TEKS: (29B) recognize elements and symbols of blueprints and drawings, (29D) recognize different classifications of drawings, (29E) interpret and use drawing dimensions, (12C) create memos and notes
ELPS: (1F) use accessible language and learn new and essential language in the process
CLICK TO DOWNLOAD GRID PAPER
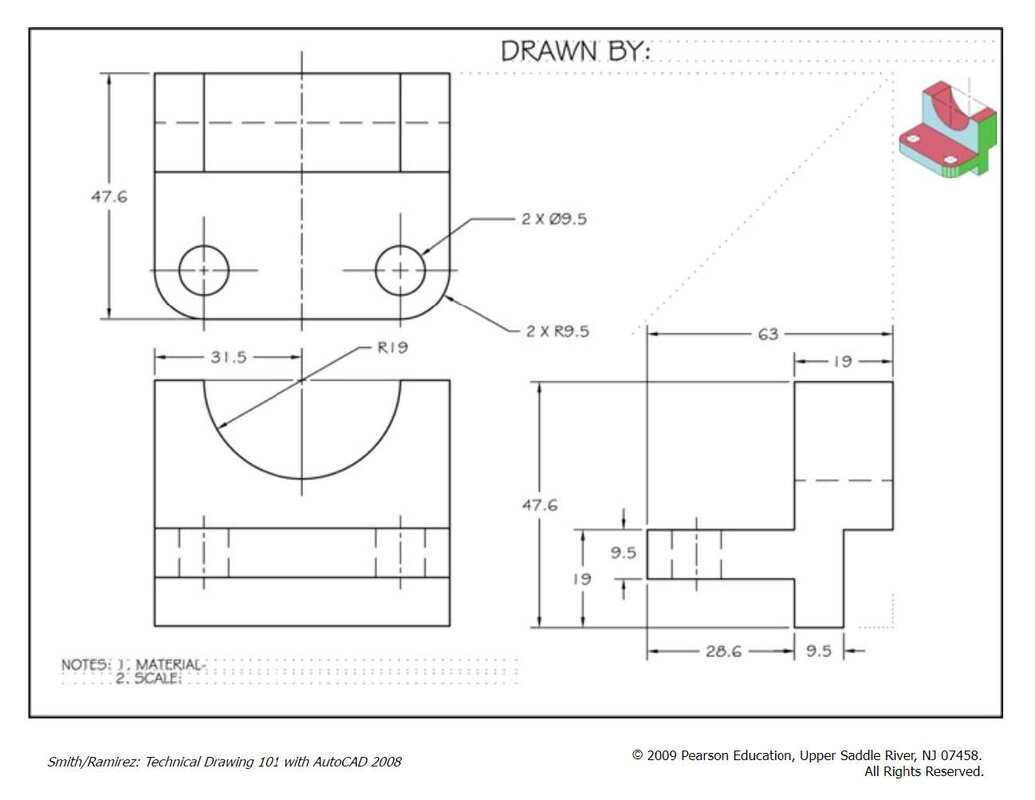
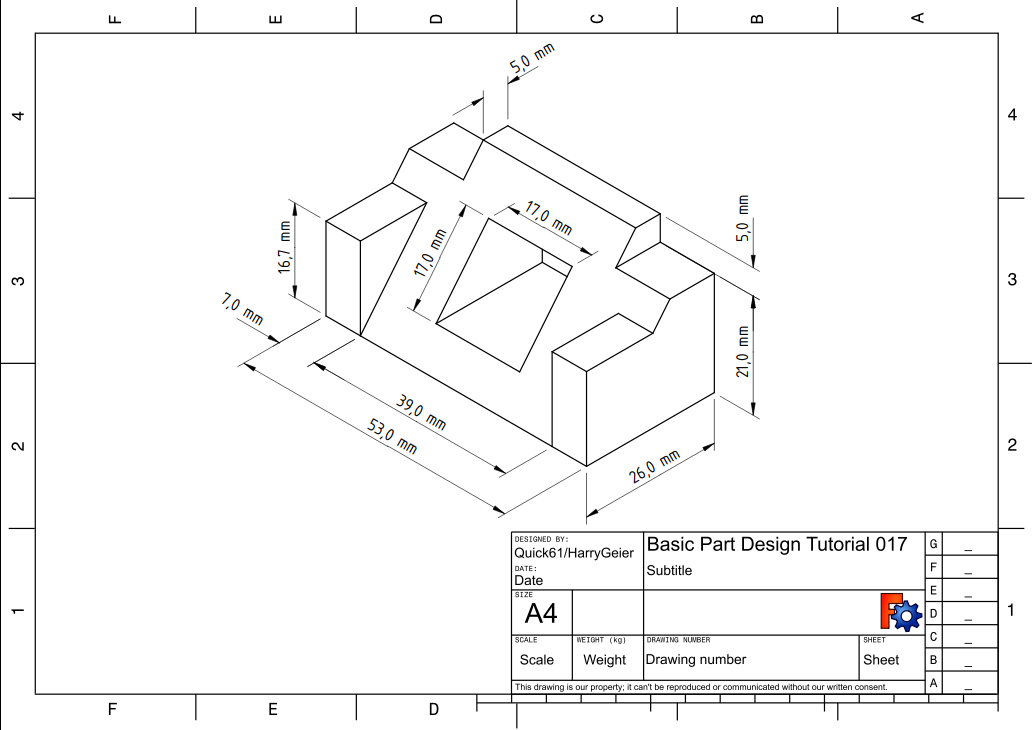
To truly reach mastery level you must create your own design according to industry standards and must present it in a professional manner. Create your own drafted design on a grid paper using precise scaled drawing and lettering techniques.
In order to complete this assignment your drawing(s) must be:
1. Sufficiently complex enough to show an advanced understanding of AutoCAD. The drawing(s) can't be too simple.
2. Drawn to exact specifications. Every line, shape, and angle must be drawn to a specific size. (Ex. 1.000", not 1.853492")
3. Dimensioned sufficiently. Another person must be able to redraw/build your design based only on the dimensions you give.
4. Presented professionally. The drawings on the page must be as large and clear as they can be, and must be organized sensibly.
See below for examples:
PART 1
PART 2